- react-dnd
- react 友好
- 组件间解耦
- Describing the dragged data as a plain object helps you keep the components decoupled and unaware of each other.
- drag source
- drop target
- backend
- …
- 是为垂直和水平列表专门构建的更高级别的抽象,没有提供 react-dnd 提供的广泛功能
- 外观漂亮,可访问性好,物理感知让人感觉更真实的在移动物体
- 开发理念上是拖拽,不支持copy/clone
react-sortable-hoc
- 不支持拖拽到另一个容器中?
- 未看到copy/clone
- 只是对组件的一个wrapper来提供拖拽能力
相关链接
-
React 拖拽组件对比
-
a + b in JavaScript
计算方法
- 将A和B都转换为原始值(primitive,执行ToPrimitive),这里记为A1,B1
- 如果A1和B1中有一个值为string,则将A1、B1都转换为string(执行ToString),其值记为A2、B2,将A2 B2连接后就是A+B的结果
- 否则的话将A1、B1都转换为number(执行ToNumber),其值记为A3、B3,将A3 B3相加即为A+B的结果
ToPrimitive(obj,preferredType)
JS引擎内部转换为原始值ToPrimitive(obj,preferredType)函数接受两个参数,第一个obj为被转换的对象,第二个preferredType为希望转换成的类型(默认为空,接受的值为Number或String)
在执行ToPrimitive(obj,preferredType)时如果第二个参数为空并且obj为Date的实例时,此时preferredType会被设置为String,其他情况下preferredType都会被设置为Number
如果preferredType为Number,ToPrimitive执行过程如下:
- 如果obj为原始值,直接返回;
- 否则调用 obj.valueOf(),如果执行结果是原始值,返回之;
- 否则调用obj.toString(),如果执行结果是原始值,返回之;
- 否则抛异常。
如果preferredType为String,将上面的第2步和第3步调换,即:
- 如果obj为原始值,直接返回;
- 否则调用obj.toString(),如果执行结果是原始值,返回之;
- 否则调用 obj.valueOf(),如果执行结果是原始值,返回之;
- 否则抛异常。
我写的一个ToPrimitive函数可以在这里查看 >> JS Bin – Collaborative JavaScript Debugging
-
fetch下载文件
fetch跨域下载文件
为何读取到的
content-disposition
header为null在跨域访问时,XMLHttpRequest对象的getResponseHeader()方法只能拿到一些最基本的响应头,
- Cache-Control
- Content-Language
- Content-Type
- Expires
- Last-Modified
- Pragma
如果要访问其他头,则需要服务器设置Access-Control-Expose-Headers
Access-Control-Expose-Headers:Content-Disposition
保存文件
fetch(`${url}`, {
method: 'POST',
headers: {
...
},
mode: 'cors',
body: JSON.stringify({
companyId: this.state.params.companyId,
startDate: this.state.listParams.startDate,
endDate: this.state.listParams.endDate,
})
}).then(res => res.blob().then(blob => {
let a = document.createElement('a');
let url = window.URL.createObjectURL(blob); // 获取 blob 本地文件连接 (blob 为纯二进制对象,不能够直接保存到磁盘上)
let disposition = res.headers.get('content-disposition');
let filename = (disposition && disposition.replace(/attachment;.*filename=/, '')) || 'uv.xls'
console.log('disposition:', disposition)
console.log('filename:', filename)
a.href = url;
a.download = filename;
a.click();
// 使用完ObjectURL后需要及时释放, 否则会浪费浏览器存储区资源.
window.URL.revokeObjectURL(url);
}))
}
参考文章
-
亲手实现一个Promise
为何要手写Promise?直接import不行吗?
身处技术圈,前端技术真的是日新月异,异步的实现方式从callback、到Promise、再到Generator、Async/Await,有了长足的发展,Promise作为发展过程中的一种产物其既是callback的一种改良,也是Generator、Async/Await的基础。
直接import一个Promise类库当然可行(在支持的浏览器中直接使用Promise也未尝不可),但是如果我们能够亲手实现一个Promise,那么我们还能够:
- 对Promise的理解更加深刻
- 提升自己的类库编写能力,尤其是各种边界值的处理
另外有一点需要说明,本文针对的是有一定Promise基础的同学,基础知识不在本文范畴之内,不了解的话请自行Google :)
实现的内容
实现之前我们先来思考下,一个Promise中到底有哪些是必须要实现的?
按照Promise/A+的标准来说,只需要Promise的then方法即可,至于怎么实现、constructor怎么写,完全没有提及。不过虽然看似东西很少,但是实质上还是有蛮多东西要处理的。
首先,constructor是必须的,在这里我们需要做一些初始化的动作:
- 初始状态处理
- 对传入的resolver进行判断并做容错处理
- 执行传入的resolver函数
- 定义resolve、reject函数
其次,then方法由于是每个实例上都有,所以会挂在prototype上面,then方法中我们需要做的事情有
- 对传入的onFulfilled、onRejected进行判断并做容错处理
- 判断当前Promise的状态并返回一个新的Promise
然后,我们还需要一个resolvePromise函数,这个函数根据标准而来(其实不管怎样,Promise的实现中都是少不了这样的处理过程)
至于原型上的catch方法以及race、all等静态方法,暂时不处理,而且这些在我们实现了Promise的基础代码后都是很容易的事情,暂时不做处理。
Constructor
function Promise(resolver) { var self = this self.status = 'pending' self.fulfilledCallbacks = [] self.rejectedCallbacks = [] self.data = null if(typeof resolver !== 'function') { throw new TypeError('Promise resolver ' + resolver + 'is not a function') } function onFulfilled(data) { setTimeout(function () { if(self.status !== 'pending') return self.status = 'fulfilled' self.data = data var currentCallback for(var i = 0; i < self.fulfilledCallbacks.length; i++) { currentCallback = self.fulfilledCallbacks[i] typeof currentCallback === 'function' && currentCallback(self.data) } }) } function onRejected(reason) { setTimeout(function () { if(self.status !== 'pending') return self.status = 'rejected' self.data = reason var currentCallback for(var i = 0; i < self.rejectedCallbacks.length; i++) { currentCallback = self.rejectedCallbacks[i] typeof currentCallback === 'function' && currentCallback(self.data) } }) } try { resolver(onFulfilled, onRejected) }catch (e){ onRejected(e) } }
可以看到,在构造函数中最上面是对初始状态的处理。
self.status = 'pending' // 初始化时必定是pengding状态, self.fulfilledCallbacks = [] // fulfilled后执行的回调 self.rejectedCallbacks = [] // rejected后执行的回调 self.data = null // 初始化时Promise内部的数据
接着对resolver做了判断,
if(typeof resolver !== 'function') { throw new TypeError('Promise resolver ' + resolver + 'is not a function') }
因为对于一个Promise来说,传入的resolver不是function就没有意义了,比如
var p = new Promise(100) //那么这里传入100的时候,到底想干嘛?
然后是onFulfilled和onRejected这两个函数的定义,即我们传递给一个Promise实例里的resolve和reject两个参数
var p = new Promise( (resolve, reject) => { resolve() // resolve即onFulfilled、reject即onRejected })
function onFulfilled(data) { setTimeout(function () { if(self.status !== 'pending') return self.status = 'fulfilled' self.data = data var currentCallback for(var i = 0; i < self.fulfilledCallbacks.length; i++) { currentCallback = self.fulfilledCallbacks[i] typeof currentCallback === 'function' && currentCallback(self.data) } }) }
在onFulfilled中首先我们看到的是一个setTimeout,这样做的目的是为了确保onFulfilled是异步执行的,至于为何要异步执行,目前还没有搞懂,个人感觉是非必须的,但是如果设置为同步的会导致测试无法通过,在查看bluebird的源代码时发现这部分根据data做了判断,如果非Promise会是同步,而是Promise的话会异步执行,这个坑先留着,待后面解决。
setTimeout内先对状态进行判断,如果其已经是fulfilled或rejected我们直接返回,接着就是一个for循环执行回调。
onRejected和onFulfilled大同小异,不多赘述。
try { resolver(onFulfilled, onRejected) }catch (e){ onRejected(e) }
最后我们直接在一个try/catch中执行传入的resolver,以便对执行resolver时候的错误进行处理。
Promise.prototype.then
Promise.prototype.then = function (onFulfilled, onRejected) { var self = this var p onFulfilled = typeof onFulfilled === 'function' ? onFulfilled : function(val){return val} onRejected = typeof onRejected === 'function' ? onRejected : function(reason){throw reason} if(self.status !== 'pending') { return p = new Promise(function (resolve, reject) { setTimeout(function () { var functionToCall = self.status === 'fulfilled' ? onFulfilled : onRejected var result try { result = functionToCall(self.data) resolvePromise(p, result, resolve, reject) } catch (e) { reject(e) } }) }) } else { return p = new Promise(function (resolve, reject) { self.fulfilledCallbacks.push(function(){ try { var result = onFulfilled(self.data) // 如果上个then的返回值是个Promise实例 或者Promise resolver里面resolve的结果是个Promise实例 resolvePromise(p, result, resolve, reject) } catch (e) { reject(e) } }) self.rejectedCallbacks.push(function(){ try { var result = onRejected(self.data) // 如果上个then的返回值是个Promise实例 或者Promise resolver里面resolve的结果是个Promise实例 resolvePromise(p, result, resolve, reject) } catch (e) { reject(e) } }) }) } }
根据标准Promise.prototype.then的返回值是一个新的Promise,所以我们可以看到2处类似这样的代码
return p = new Promise(function (resolve, reject) { ... })
这2处就是根据当前Promise实例(self)的状态来做不同的处理
首先看非pending状态
- 非pending,即self已经被resolved/rejected
- 这个时候我们需要”马上”对p做处理,而不是将其放入回调中,另外为了确保then中代码块异步执行,相关代码都被包在了一个setTimeout中
- result即是执行完onFulfilled后的结果,由于并不知道result会是什么样的结果,我们在单独的一个resolvePromise函数中处理,根据result来确定p
接着再看pending,由于self还是pending状态,那么就等到self resolve或者是reject的时候再来处理,即将相应的代码放入fulfilledCallbacks/rejectedCallbacks中即可
resolvePromise
function resolvePromise(promise, x, resolve, reject){ var then var thenCalled if(promise === x) reject(new TypeError('Chaining cycle detected for promise!')) if(x instanceof Promise) { if(x.status === 'pending') { x.then(function (value) { resolvePromise(promise, value, resolve, reject) }, reject) }else{ x.then(resolve,reject) } } else if(x !== null && (typeof x === 'function' || typeof x === 'object') ){ try{ then = x.then if(typeof then === 'function') { then.call(x, function(y){ if(thenCalled) return thenCalled = true resolvePromise(promise, y, resolve, reject) }, function(r){ if(thenCalled) return thenCalled = true return reject(r) }) } else { resolve(x) } }catch(e){ if(thenCalled) return thenCalled = true return reject(e) } }else{ resolve(x) } }
刚开始的时候不是很立即为什么会有这么一个过程,想着直接根据then中onFulfilled返回的值(result)做判断,然后返回不同的Promise即可,后来发现result有各种不同的情况,而且不止一个地方需要用到,那么将其抽取出来是就合情合理了。
resolvePromise中主要的处理就是根据传入的x来决定promise(输入参数中的promise)的状态,其中最主要的2块
- x instanceof Promise 这个主要是判断如果是我们自己创建的Promise的实例
- x !== null && (typeof x === ‘function’ || typeof x === ‘object’) 这个尝试将x当做thenable处理,确保我们的Promise能够与其他Promise类库交互
其他代码更多的是边界值的判断,这里就不做赘述了。
总结
之前面试的时候被问到怎么实现一个Promise,一脸懵逼,这个问题压根没想过,然后临阵发挥的时候一直纠结于resolve在哪里,现在想想真是傻,为何为停在这里。。。🙃
参考资料
-
JS原型链回顾
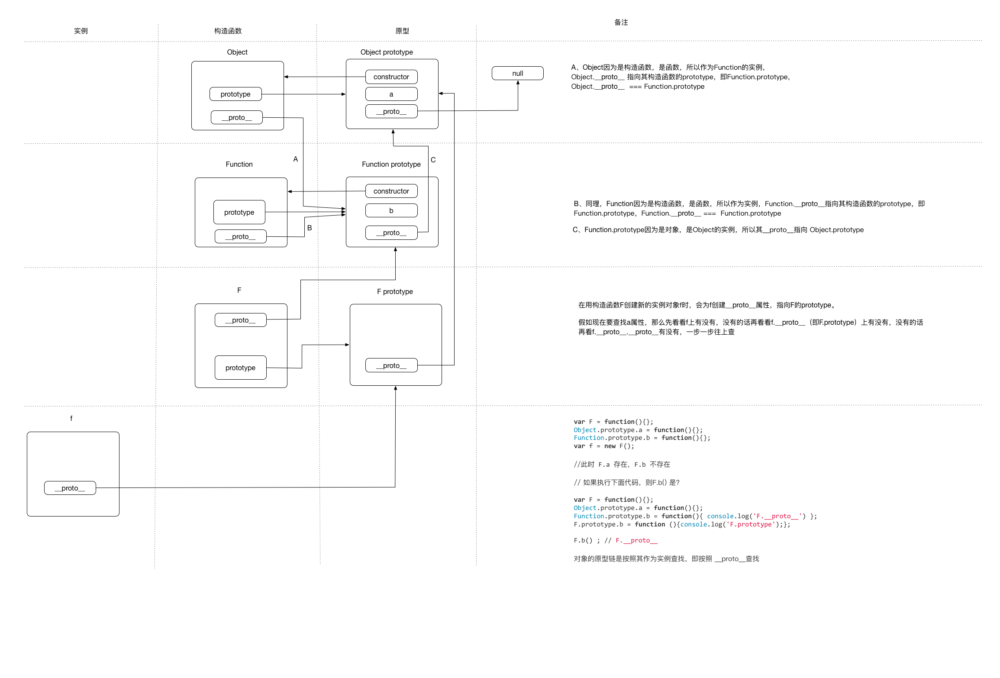
前两年在看JS原型链的时候花了挺久终于搞懂了,时间一久又渐渐生疏,趁机画个图总结下主要知识点:
- 在用构造函数F创建新的实例对象f时,会为f创建__proto__属性,指向F的prototype。
- 假如现在要查找a属性,那么先看看f上有没有,没有的话再看看f.__proto__(即F.prototype)上有没有,没有的话再看f.__proto__.__proto__有没有,一步一步往上查
另外关于Function和Object比较特殊的点:
- Object因为是构造函数,是函数,所以作为Function的实例,Object.__proto__ 指向其构造函数的prototype,即Function.prototype,Object.__proto__ === Function.prototype
- 同理,Function因为是构造函数,是函数,所以作为实例,Function.__proto__指向其构造函数的prototype,即Function.prototype,Function.__proto__ === Function.prototype
- Function.prototype因为是对象,是Object的实例,所以其__proto__指向 Object.prototype
参考文章:
-
jQuery实现多浏览器兼容HTML5 placeholder
大家都知道HTML5里面的input或者textarea里的placeholder吧,可以很轻松的在点击后隐藏提示文字,但是IE老版本的因为不支持HTML5所以必定无法用,啊啊啊!!!可是这个需求真的是很普遍,工作中已经遇到过好多次这样的了,为了以后偷懒今天下班搞了个通用的代码吧~~先说说思路吧:
- 用CSS将文本框(这里叫他 #ipt)和提示文字(这里叫他 #tips)这两个元素定位到一起,上下重叠,具体的实现方法我目前所知有a和b两种,a方法是将#ipt覆盖到#tips上,给#ipt设置透明度,b方法是将#tips覆盖到#ipt上。
- 在点击#tips或#ipt获得焦点时将#tips隐藏 / 修改#ipt透明度 / 将#tips移到到不影响#ipt输入的位置,对于方法a可以:将#tips隐藏 / 修改#ipt透明度,对于b可以将#tips隐藏 / 将#tips移到到不影响#ipt输入的位置。
- 在#ipt失去焦点时判断其值是否在trim后为空(可根据需要调整)来将#tips显示出。
- 在页面加载时同样需要判断#ipt是否在trim后为空(可根据需要调整),以防#ipt和#tips同时显示。
-
独立网站启用Chrome插件内联安装教程
关于Chrome插件想必用Chrome浏览器的童鞋都很清楚,不过这标题写的说实话有点让人晕,要解释清楚标题,首先要了解一下Chrome插件的安装机制。Chrome插件安装机制
目前据我的了解,你可以用这3种方法安装Chrome插件
- 在Chrome Web Store查找插件或者是打开某一个插件在Chrome Web Store上的链接,点击安装即可,这是最常用最通用的方法
- 获得扩展名为crx的插件 > 打开Chrome浏览器的扩展程序页面 > 将获得的文件直接拖拽至上一步所述页面 > 安装
- 拥有插件的zip压缩包 > 解压文件 > 打开Chrome浏览器的扩展程序页面 >启用开发者模式 > 点击“加载正在开发的扩展程序”并选择刚才解压出来的文件目录
然而本文所介绍的插件安装方法并不属于上述任意一种,这就是下面要说的第4种安装方法
内联安装(Inline Installation)
这内联安装我用一句话概括就是:你制作了一个插件并且已经在Chrome Web Store上发布,同时你还想让你网站内的用户也能够直接在你的网站上安装插件而不用再跑到Chrome Web Store那里。
如果还是不太明白的话可以看看下面人家官方的原文吧
Once you’ve published your app or extension, you may be wondering how users will find and install your app. For users who browse the Chrome Web Store and find your item, its a very easy one-click process to install it. However, if a user is already on your site, it can be cumbersome for them to complete the installation – they would need to navigate away from your site to the store, complete the install process, and then return.
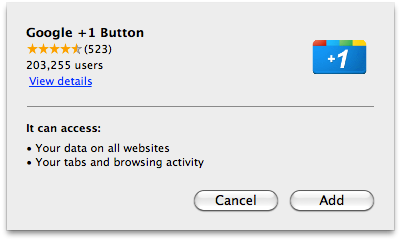
As of Google Chrome 15, you can initiate app and extensions installations “inline” from your site. These apps and extensions are still hosted in the Chrome Web Store, but users no longer have to leave your site to install them.
When users install the app, they will see an installation confirmation dialog similar to the one pictured on right. Just like the dialog displayed when installing directly from the Chrome Web Store, it lists all of the permissions that your app or extension is requesting. Additionally, this dialog includes the average Chrome Web Store rating and the number of users, giving users extra confidence about what they are about to install.
内联安装的必要条件
- 插件已经在Chrome Web Store上发布
- 内联安装的页面地址必须是插件在Chrome Web Store上发布时所关联网站的子域或子页面(比如插件发布时关联的网站是http://www.zenoven.com,那么内联安装页面的地址可以是http://chrome-extensions.www.zenoven.com或者http://www.zenoven.com/chrome-extensions)
内联安装页面的制作
1、在页面的head内插入一个Chrome Web Store link
即将下面的代码插入页面<head></head>之间
<link rel=”chrome-webstore-item” href=”https://chrome.google.com/webstore/detail/itemID“>
itemID可以在打开一个插件的Chrome Web Store链接后找到,下面是我的查看源码Chrome插件的link
<link rel=”chrome-webstore-item” href=”https://chrome.google.com/webstore/detail/ggkbiakmiljlbbfhjajlpjgckcjanbab“>
2、触发内联安装
原文里面写的比较多,按照我的理解其实很简单也就是用JS写些判断代码,增强用户体验,下面是我个人的一些逻辑步骤
- 在页面合适的地方插入一个按钮或链接或者是你想用的元素,用于触发安装,这里假设为一个button
- 用JS判断浏览器是否是Chrome,如果不是则将button设为disabled并且button内的文本修改为“只适用于Chrome浏览器”,如果是的话就直接进入下一步
- 判断该插件是否已安装,如果已安装则修改button文本为“已安装”并且设为disabled,如果未安装则进入下一步
- 调用安装函数,修改button文本为“正在安装…”并且设为disabled
- 根据安装结果修改button(安装成功则修改button文本为“安装成功”并且设为disabled,否则将button状态及文本恢复到点击button之前)
说了那么多,其实就是这段JS代码(需jQuery,另外上面所说的button已经在页面内插入,并且button的id为install-button)
(function($){ var e = $('#install-button') ,originalText = e.html() ,itemURL = $('link[rel=chrome-webstore-item]').attr('href') ,isChrome = /chrom(e|ium)/.test(navigator.userAgent.toLowerCase()); checkAndSetButton(); e.click(function(){ e.html('正在安装...').attr('disabled',true); chrome.webstore.install( itemURL ,function(){ e.html('安装成功!').attr('disabled',true); } ,function(){ e.html(originalText).attr('disabled',false); } ); }); function checkAndSetButton(){ if(isChrome){ if (typeof chrome !== "undefined" && typeof chrome.app !== "undefined" && chrome.app.isInstalled) { e.html('已安装').attr('disabled',true); } }else{ e.html('只适用于Chrome浏览器').attr('disabled',true); } } })(jQuery);
好了,上面就是独立网站启用Chrome插件内联安装教程的主要内容了。
PS:有的童鞋可能会问怎么样才能在指定页面的指定位置插入任意代码呢?我的办法是安装一个插件:Code Insert Manager ,该插件就可以在不改动任何代码的情况下完成上述任务。
另附一些我制作的Chrome插件:
-
Chrome插件[百度一下]发布